3.7 Embedding Parts of RAYGUIDE into own Applications |
In the previous chapter is shown how RAYGUIDE can be integrated as a whole in own applications. In this chapter will be explained how this can be done if only parts of RAYGUIDE's GUI are needed.
RAYGUIDE makes heavy use of the Prism framework, Version 8.1, and follows the MVVM pattern (Model-View-ViewModel). If interested you can find the Prism documentation here: https://prismlibrary.com/docs .
Another library the API depends on is MahApps.Metro. This is a user interface toolkit for styling the GUI with another look and feel. See https://mahapps.com/ for details.
And a third library that will be referenced in this example is Telerik UI for WPF; we use it especially for the tree of job elements because it is more efficient than the tree WPF provides. More information can be found here: www.telerik.com .
None of these libraries need special attention, referencing them at some places in XAML files will be enough.
In Visual Studio, create a new project of type "WPF Application".
Add our NuGet package "RAYLASE.Marker.GUI.Wrapper as described in the above sections.
If auto-wiring is used, RAYGUIDE follows its own naming convention. The convention used by RAYGUIDE is to put both the view and the view model under the same namespace (usually the same folder), and to name the type of the view model with the same name as the type of the view and append the suffix "Model". For example, if your view is called "MyWindow", the the view model has to be named "MyWindowModel".
ADVANCED: To use a different convention for auto-wiring, it is possible to create a custom wrapper. Please see the sample codes by following the link at the bottom of this chapter.
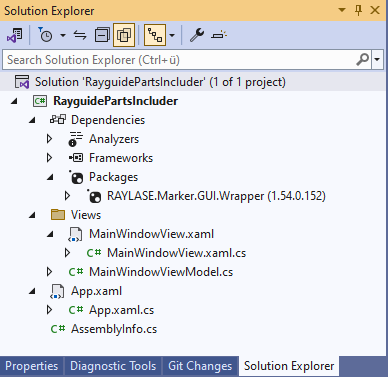
In the project's root create a new folder Views, create therein a new "Window (WPF)" named
MainWindowView.xaml and the class
MainWindowViewModel.
The already existing files MainWindow.xaml and
MainWindow.xaml.cs must be deleted.
The project structure should be then as shown here:
In this application, just three elements of RAYGUIDE will be used:
A tab control showing the jobs and their graphical representations
which needs a binding to an instance of RAYGUIDE's MainViewModel,
the tree of job elements ("JobRegion") and the list of available
job elements ("JobElementRegion"). These can be put into the main window
by replacing the original Grid element by a
StackPanel.
And two XML name spaces need to be added, one for Prism, the other for the RAYGUIDE renderer.
The whole XAML file should look like this:
<Window x:Class="RayguidePartsIncluder.Views.MainWindowView"
        xmlns="http://schemas.microsoft.com/winfx/2006/xaml/presentation"
        xmlns:x="http://schemas.microsoft.com/winfx/2006/xaml"
        xmlns:d="http://schemas.microsoft.com/expression/blend/2008"
        xmlns:mc="http://schemas.openxmlformats.org/markup-compatibility/2006"
        xmlns:local="clr-namespace:RayguidePartsIncluder.Views"
        xmlns:prism="http://prismlibrary.com/"
        xmlns:views="clr-namespace:RAYLASE.Marker.GUI.Renderer2D.Views;assembly=RAYLASE.Marker.GUI.Renderer2D"
        mc:Ignorable="d"
        Title="MainWindowView" Height="690" Width="900">
  <StackPanel Orientation="Horizontal">
    <ContentControl prism:RegionManager.RegionName="JobRegion" MinWidth="200" MaxHeight="800"/>
    <ContentControl prism:RegionManager.RegionName="JobElementRegion" Margin="5" />
    <TabControl ItemsSource="{Binding MainViewModel.MainWorkspaceViewModels}" SelectedItem="{Binding MainViewModel.ActiveContent}" VerticalAlignment="Top">
      <TabControl.ItemTemplate>
        <DataTemplate>
          <TextBlock Text="{Binding JobDefinitionLabel}" FontSize="12" />
        </DataTemplate>
      </TabControl.ItemTemplate>
      <TabControl.ContentTemplate>
        <DataTemplate>
          <views:MainWorkspaceView HorizontalAlignment="Stretch" Width="600" Height="600" DataContext="{Binding}" />
        </DataTemplate>
      </TabControl.ContentTemplate>
    </TabControl>
  </StackPanel>
</Window>
The code-behind file needs no changes, but in the view model file MainWindowViewModel.cs the class must be derived from our class BindableBase and an instance of RAYGUIDE's MainViewModel needs to be added as a property. By some Prism magic, it can be given as parameter in the constructor and needs to be initialized there. This is the whole file:
using Prism.Mvvm;

namespace RayguidePartsIncluder.Views
{
    public class MainWindowViewModel : BindableBase
    {
        public RAYLASE.Marker.GUI.Main.Views.MainViewModel MainViewModel { get; }

        public MainWindowViewModel( RAYLASE.Marker.GUI.Main.Views.MainViewModel mainViewModel )
        {
            MainViewModel = mainViewModel;
            mainViewModel.Initialize();
        }
    }
}
During initialization it is checked e. g. if the needed configuration files are there (they will be created in folder %programdata%\RayguidePartsIncluder\) or if a SP-ICE 3 card is configured (the user will be prompted to do so if not).
In file App.xaml just a resource dictionary is to be added which provides the application with some resources of the Telerik and MahApp libraries and some resources of RAYGUIDE. The whole file will look like this:
<prism:PrismApplication x:Class="RayguidePartsIncluder.App"
             xmlns="http://schemas.microsoft.com/winfx/2006/xaml/presentation"
             xmlns:x="http://schemas.microsoft.com/winfx/2006/xaml"
             xmlns:prism="http://prismlibrary.com/"
             xmlns:local="clr-namespace:RayguidePartsIncluder">
  <Application.Resources>
    <ResourceDictionary>
      <ResourceDictionary.MergedDictionaries>
        <ResourceDictionary Source="pack://application:,,,/Telerik.Windows.Themes.Fluent;component/Themes/System.Windows.xaml" />
        <ResourceDictionary Source="pack://application:,,,/Telerik.Windows.Themes.Fluent;component/Themes/Telerik.Windows.Controls.xaml" />
        <ResourceDictionary Source="pack://application:,,,/Telerik.Windows.Themes.Fluent;component/Themes/Telerik.Windows.Controls.Input.xaml" />
        <ResourceDictionary Source="pack://application:,,,/Telerik.Windows.Themes.Fluent;component/Themes/Telerik.Windows.Controls.Navigation.xaml" />
        <ResourceDictionary Source="pack://application:,,,/Telerik.Windows.Themes.Fluent;component/Themes/Telerik.Windows.Controls.Docking.xaml" />

        <ResourceDictionary Source="pack://application:,,,/MahApps.Metro;component/Styles/Controls.xaml" />
        <ResourceDictionary Source="pack://application:,,,/MahApps.Metro;component/Styles/Fonts.xaml" />
        <ResourceDictionary Source="pack://application:,,,/MahApps.Metro;component/Styles/Themes/Light.Steel.xaml" />

        <ResourceDictionary Source="pack://application:,,,/RAYLASE.Shared;component/GUI/ColorScheme.xaml" />
        <ResourceDictionary Source="pack://application:,,,/RAYLASE.Shared;component/GUI/MahAppsResourceDictionary.xaml" />
        <ResourceDictionary Source="pack://application:,,,/RAYLASE.Shared;component/GUI/RaylaseResourceDictionary.xaml" />
        <ResourceDictionary Source="pack://application:,,,/RAYLASE.Marker.Common;component/GUI/RayguideConverterResourceDictionary.xaml" />
        <ResourceDictionary Source="pack://application:,,,/RAYLASE.Marker.GUI.Common;component/RayguideResourceDictionary.xaml" />
      </ResourceDictionary.MergedDictionaries>
    </ResourceDictionary>
  </Application.Resources>
</prism:PrismApplication>
Please note that the application class must be changed to type PrismApplication; the Prism name space must be included therefore.
Our PrismWrapper does the most work for initializing the Prism framework. So, only little modifications are necessary here. Basically the PrismWrapper must be initialized and cleaned up. All four methods are demanded by the Prism framework. This is the whole file:
ADVANCED: For more customization, it is possible to create a custom wrapper that inherits PrismWrapper. Please see the sample codes by following the link at the bottom of this chapter.
//-----------------------------------------------------------------------------
// This example shows how you can add parts of RAYGUIDE's GUI into your own
// applications.
// See chapter 3.7 in the SDK user manual for detailed explanations.
// A similar example with more commands than only these three seen below can be
// found in sample project "\SDK\SampleCode\SampleApplications\ReusableGUI".
//-----------------------------------------------------------------------------

using Prism.Ioc;
using RayguidePartsIncluder.Views;
using RAYLASE.Marker.GUI.Wrapper;
using System.Threading.Tasks;
using System.Windows;
using System.Windows.Input;

namespace RayguidePartsIncluder
{
    /// <summary>
    /// Interaction logic for App.xaml
    /// </summary>
    public partial class App
    {
        private PrismWrapper _prismWrapper;

        protected override void OnStartup( StartupEventArgs e )
        {
            _prismWrapper = new PrismWrapper { ShouldIgnoreDomain = Keyboard.IsKeyDown( Key.LeftShift ), TaskScheduler = TaskScheduler.FromCurrentSynchronizationContext(), CreateContainerExtensionDelegate = CreateContainerExtension, CreateShellDelegate = CreateShell };
            _prismWrapper.OnStartup();
        }

        protected override void RegisterTypes( IContainerRegistry containerRegistry )
        {
        }

        protected override Window CreateShell()
        {
            MainWindowView customMainView = _prismWrapper.Container.Resolve<MainWindowView>();
            return customMainView;
        }

        protected override void OnExit( ExitEventArgs e )
        {
            base.OnExit( e );
            _prismWrapper.OnExit();
        }
    }
}
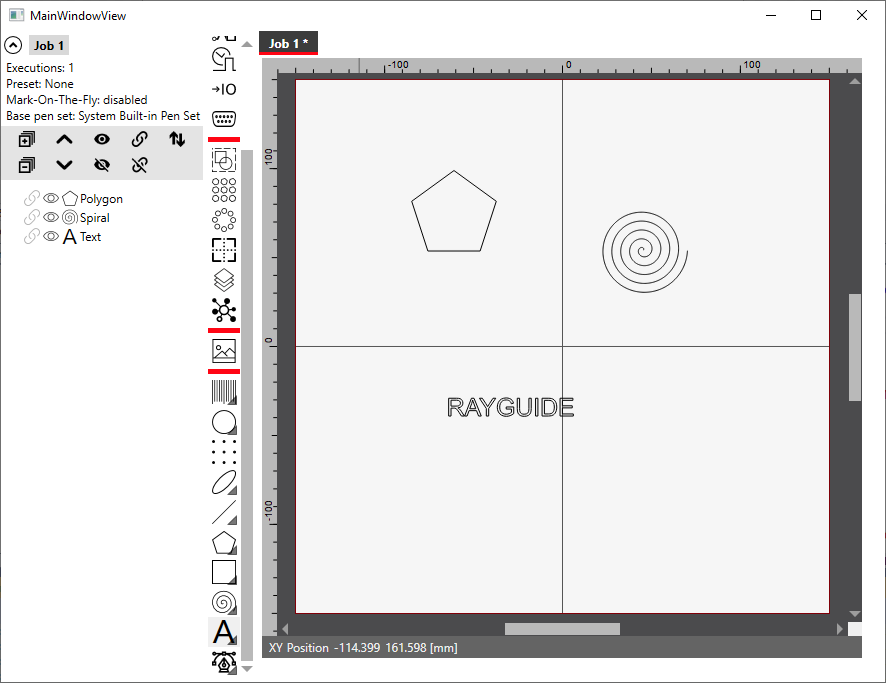
When the application is started the first time, as mentioned, the configuration files will be created in the (probably hidden) Windows ProgramData folder. But there is no scan controller configured yet, the user is prompted to do this. If it is done the application will look like this:
As usual the whole project is available in the Tutorials folder.