3.3 Important Classes |
The RAYGUIDE API is a rather comprehensive framework. Therefore it is not possible to introduce all classes in their mutual correlations here, but only the most important ones. Please refer to chapter 5 Programmer's API Reference for a description of the others.
The fundamental class in our API is the class MarkerAPI. An instance of this class must be created in any application or plug-in (not in case of a Custom UI plug-in, see section 3.4 Writing Plug-ins for Use in RAYGUIDE) that uses the API (the using statement ensures that MarkerAPIDispose is called automatically):
using (MarkerAPI markerAPI = new MarkerAPI())
{
  // application code ...
}
The class provides the programmer with some "manager" interfaces to handle all the resources of the API; the developer will most probably get in contact with these:
IConfigurationManager: Loading, saving, handling of all kinds of configurations (system specific, user specific, preferences etc.).
IDeviceManager: Creating, removing, handling of all kinds of devices (controller cards, laser controllers, scan controllers).
IJobManager: Creating, loading, saving, validating, executing of jobs.
ITemplateManager: Handling of job element and filling templates.
For example, the next line of code adds a SP-ICE-3 device to the list of managed devices:
markerAPI.DeviceManager.AddDevice("my SP-ICE-3 card", typeof(SPICE3Device));
Or, to create a job, one could write:
IJobManager jobManager = markerAPI.JobManager;
JobDefinition jobDef = jobManager.CreateNewJob("Hello World");The class JobDefinition holds all data relevant for a job (there is no class named "Job"). Some basic properties of this class are e. g. the Label that is shown in the job's tab in RAYGUIDE's main window, the number of Executions which should be performed when the job is marked, or the ScanControllers the job will be sent to when marking. The most important property is of course the list of job elements JobElements the job consists of.
The methods in the class serve mainly for adding, inserting and removing job elements. To add a rectangle to the job defined above one could type:
MarkableRectangle rectangle = new MarkableRectangle { Size = new dvec2(20000, 10000) };
JobElementHolder jeHolder = jobDef.AddJobElement(rectangle);
AddJobElement(BaseJobElement) expects an object of a class derived from BaseJobElement and returns an object of type JobElementHolder which will be explained below.
Job elements are the objects a job consists of and are stored in the property JobDefinitionJobElements which is a list storing elements of type JobElementHolder. They are derived from class BaseJobElement. All job elements are so-called plug-ins and derived from the abstract class BasePlugin.
There are job elements which can be marked, as a rectangle e. g., and there are job elements which are not markable but control the job execution. The latter are automation and MOTF (Mark On The Fly) objects. Markable objects are divided into so-called flow job elements (for grouping or matrix copying) and really markable objects which are subdivided into vector graphic objects and bitmaps.
The class diagram for job elements is shown in the following figure; for brevity most of the vector graphic objects are omitted here (e. g. MarkableSpiral, MarkableText etc. are not shown but represented by the class with the ellipsis):
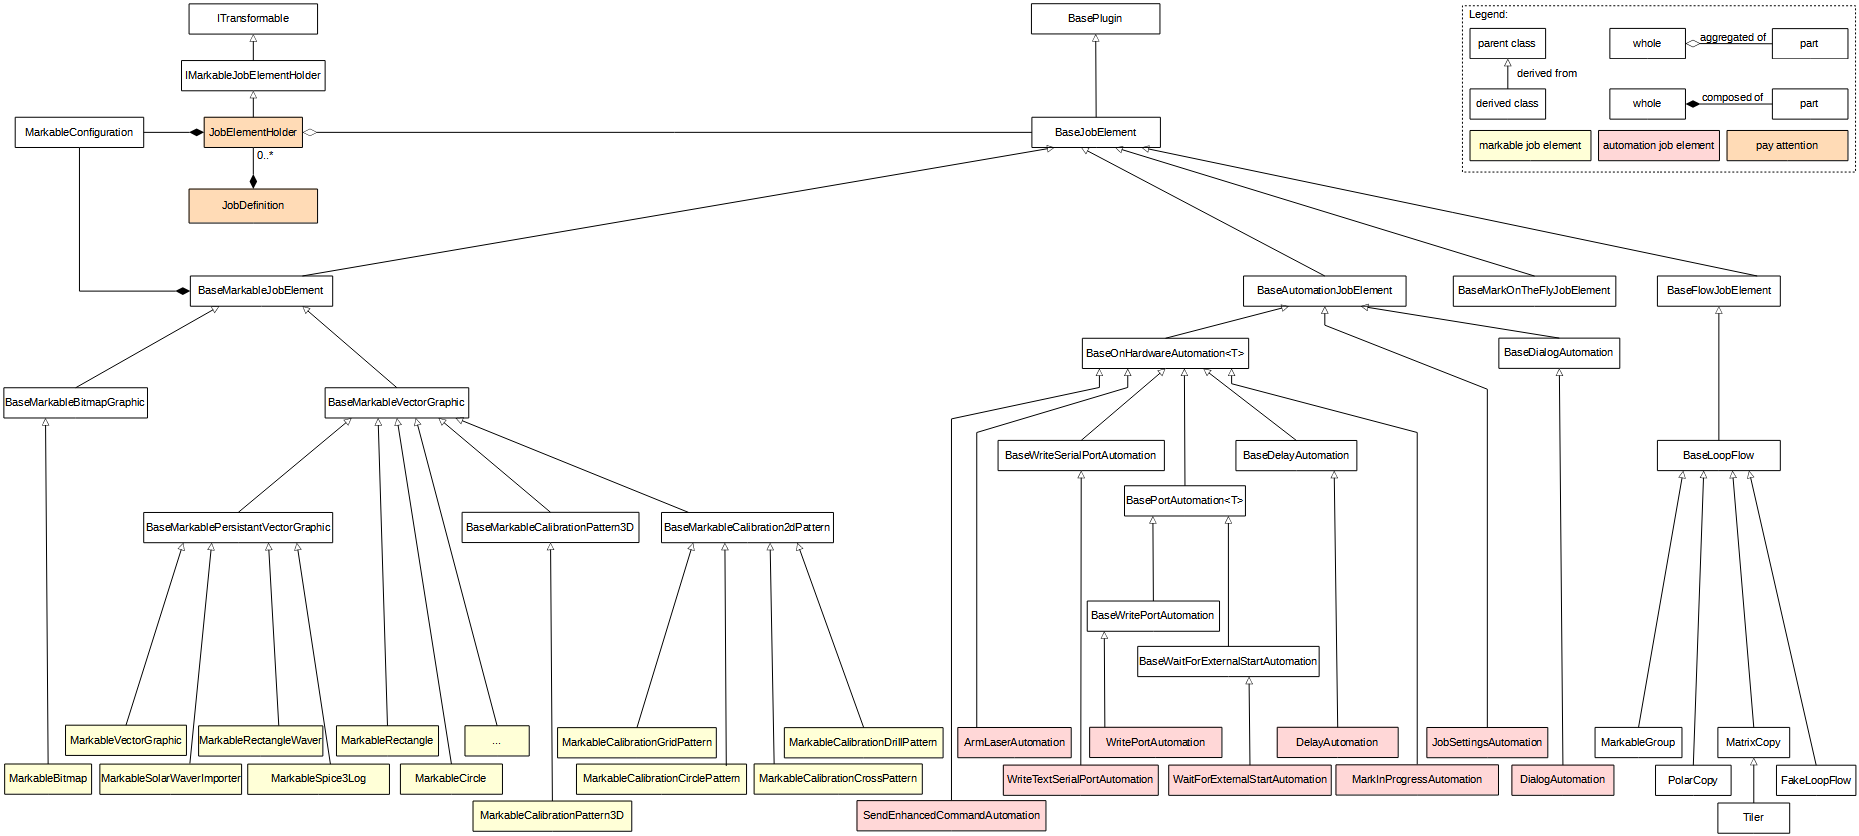
A JobElementHolder is created for a job element (i. e. one of the yellow and pink colored objects in the diagram above) when the job element is added to a job, holds in its property JobElement the concrete job element and stores and manages additional data of it. Especially the scaling and rotation of the object relative to the world coordinate system can be done with the corresponding methods, and these are hold in a transformation matrix. This matrix is stored in the ModelMatrix element of the holder's property MarkableConfiguration.
In case the job element is a BaseFlowJobElement, i. e. a MarkableGroup, MatrixCopy or PolarCopy object, the holder uses its read-only list property Children to store the elements. These are of course JobElementHolders as well, and they have their own MarkableConfiguration property. This is used to store the transformation data of the child relative to its parent BaseFlowJobElement.
The motivation for the JobElementHolder class is mainly that a concrete job element can be reused at several places in a job, e. g. in a group hierarchy.
A job element can be configured by means of its property MarkableConfiguration. It contains the transformation matrix (relative to the world or relative to its parent) and some other data as the marking mode (i. e. should the object being filled, outlined or both or marked at all), a list of "pens" the job element is using (i. e. process parameters, see chapter "Process Parameters" in the RAYGUIDE User Manual) and some more.
For some reasons not only the JobElementHolder has a MarkableConfiguration as a property but the BaseMarkableJobElement as well, and the data is grabbed by RAYGUIDE from the one or the other place when executing as shown in the following table:
Property | JobElementHolder | BaseMarkableJobElement |
|---|---|---|
ModelMatrix | + | - |
FlippedAxis | + | - |
FlippedMatrix | + | - |
Offset | + | - |
TransformationCenter | + | - |
IsDirty | + (if not null in job element) | + |
MarkerProfile.ShouldMark | - | + |
MarkerProfile.PenSet | + | - |
MarkerProfile.DefaultPen | - | + |
MarkerProfile.MotfTriggerProfile | + | - |
MarkerProfile.MarkingMode | - | + |
MarkerProfile.ContainsOutline | - | + |
MarkerProfile.ContainsFilling | - | + |
The model matrix in a job element is not used by RAYGUIDE and can be used by the programmer for own purposes; see section 3.11 Coordinate Systems and Transformations.
For convenience, class BaseMarkableJobElement contains additionally a direct reference to MarkableConfiguration.MarkerProfile as a shortcut. If the rectangle is of type MarkableRectangle for example, the following two lines of code do the same therefore:
rectangle.MarkableConfiguration.MarkerProfile.DefaultPen.LaserPower = 0.1;
rectangle.MarkerProfile.DefaultPen.LaserPower = 0.1;
With the exception of bitmaps all graphic in RAYGUIDE is vector graphic. VectorGraphicEngine is the fundamental class for manipulating primitive elements such as points, arcs, etc. The class BaseMarkableVectorGraphic, introduced in the above class diagram already, contains an instance of it, and therefore all the derived job element classes (the yellow ones in the diagram) have access to its data and methods. Here are the involved classes and their relations:
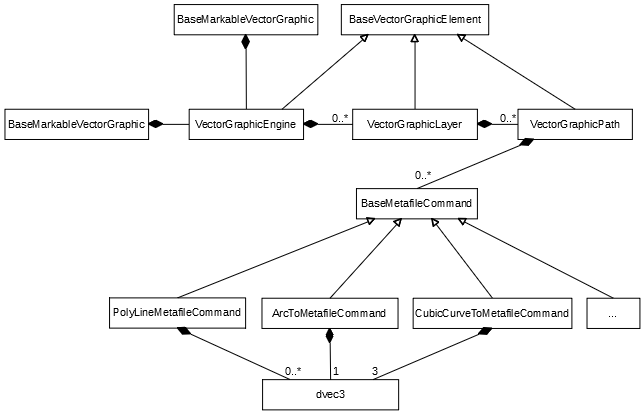
As can be seen the VectorGraphicEngine contains a list of VectorGraphicLayers. A layer is used to group parts of a vector graphic; they can have a common set of process parameters in this way.
A layer contains a list of VectorGraphicPaths. A path again consists basically of a sequence of BaseMetafileCommands, which are the basic objects the scan controller will operate on. Every path possesses a start point, which serves as the start point of the first command. All subsequent commands implicitly begin at the preceding command's end point. A path forms a continuous line therefore (unless a dashed line pattern is defined in the process parameters).
What is stored in a command depends on its type. A
PolyLineMetafileCommand
e. g., shown in the class diagram above, consists of an arbitrary number of points building the
polyline. A point is represented by the dvec3
structure which is provided by the open source GlmSharp
library and consists of three doubles for the point's
three space coordinates.
The
ArcToMetafileCommand
has only one dvec3 element for storing its center point, a double for the
radius and another double for the sweep angle (not shown in the diagram).
The arc's start point, as said,
is the predecessor's end point. To mention a last example the
CubicCurveToMetafileCommand
has apart from its implicit start point three points: two control points for modifying the curve
and an end point.
The properties and methods in these classes can be used to manipulate the objects. To mark a triangle for example the following lines can be added after the section 3.d) to our 2.4 Hello World Example:
// 3.e) Add a triangle to the job:
MarkableVectorGraphic vectorGraphic = new MarkableVectorGraphic(); // create the vector graphic object
VectorGraphicEngine engine = vectorGraphic.VectorGraphicEngine;    // get its VectorGraphicEngine
VectorGraphicLayer layer = engine.AddLayer();                      // add a layer
VectorGraphicPath path = layer.AddPath( new dvec3( 0, 0, 0 ) );    // add a path starting at point (0,0,0)
PolyLineMetafileCommand polyline = new PolyLineMetafileCommand();  // create e. g. a polyline command
polyline.AddPoint( new dvec3( 50000, 0, 0 ) );                     // add a point 50 mm to the right
polyline.AddPoint( new dvec3( 25000, 50000, 0 ) );                 // add a point at position (25 mm, 50 mm, 0)
polyline.AddPoint( new dvec3( 0, 0, 0 ) );                         // add the end point at (0,0,0)
path.AddMetafileCommand( polyline );                               // add the command to the path
vectorGraphic.Initialize();                                        // initialize the job element
jobDef.AddJobElement( vectorGraphic );                             // and add it to the job
A reference to RAYLASE.Marker.VectorGraphicElement.dll and some using statements as suggested by Visual Studio are to be added to the code as well.
If one wants to create job elements in a more generic way (e. g. if their type is not known at compile time) the method IJobElementManagerCreate(Type) can be used instead of the new operator:
BaseMarkableVectorGraphic newVg = (BaseMarkableVectorGraphic)markerAPI.JobElementManager.Create( typeof( MarkableVectorGraphic ) );Not only the job elements are important when handling with jobs, but the devices as well. They build a similar class hierarchy derived from class BasePlugin. and class BaseDeviceController:
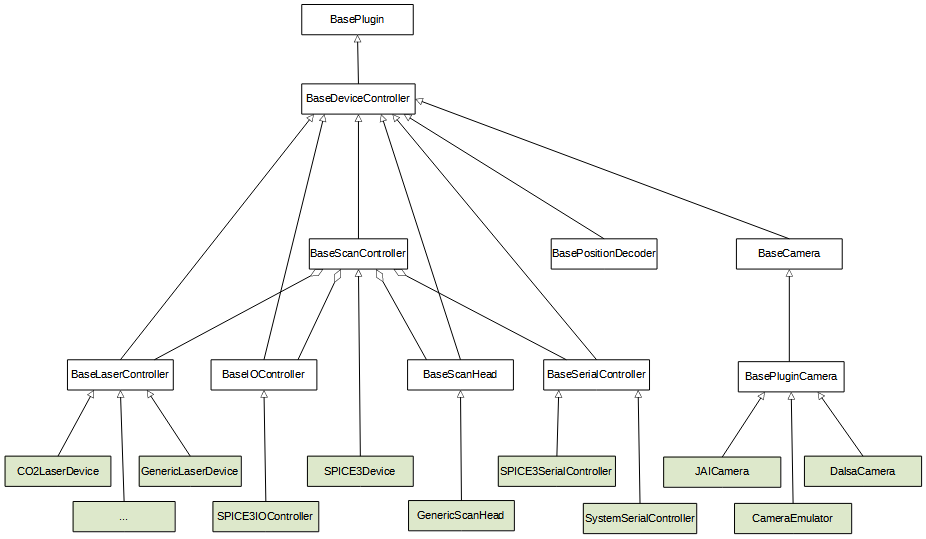
The devices are divided into groups representing the different functions they have to fulfill; they are derived from some subclasses therefore for laser controllers, I/O controllers, scan heads, serial controllers and cameras. But, the most important one is BaseScanController which holds most of the others as properties and manages the interaction between these components. That means especially that the different device objects need to be linked with the scan controller object as is already shown in the "Hello World" example:
MarkerAPI markerAPI = new MarkerAPI();
IDeviceManager deviceManager = markerAPI.DeviceManager;
deviceManager.AddDevice( "my SP-ICE-3 card", typeof( SPICE3Device ) );
BaseScanController scanController = (BaseScanController)deviceManager.GetDevice( "my SP-ICE-3 card" );
GenericScanHead scanHead = new GenericScanHead();
scanController.AssignScanHead( scanHead );
scanController.LaserController = new CO2LaserDevice();
The Executor classes offer fundamental functionalities to execute jobs:
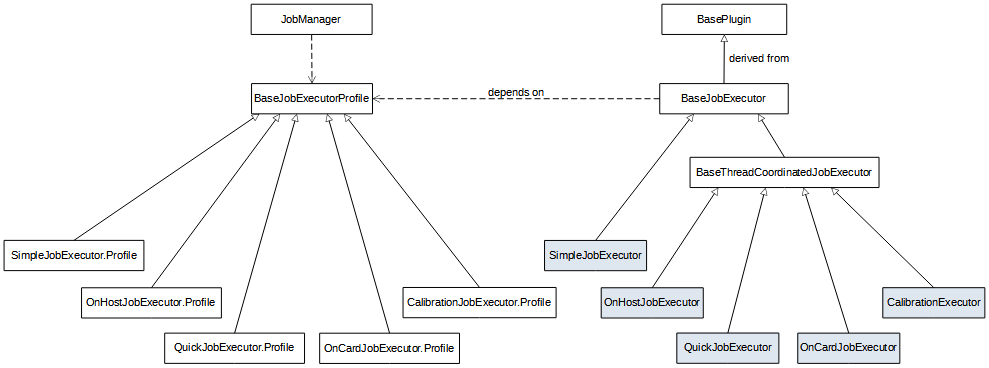
When executing a job an instance of class BaseJobExecutorProfile has to be created with the job manager described above. Its method IJobManagerGenerateJobExecutorProfile(Type) expects as parameter one of the executor types:
OnHostJobExecutor:
The host computer controls the execution.QuickJobExecutor:
The host computer controls the execution, all automation objects are ignored.OnCardJobExecutor:
For best response times of triggers etc. (especially for MOTF applications) the job should be uploaded to the scan controller card and executed directly there.SimpleJobExecutor:
This job executor is controlled by the host application and does only the very basic of execution. I. e. it processes only vector graphics, ignoring MOTF and tiling and does not check on out of field conditions; no multiple controllers (only the first one is used), no streaming, no optimization; everything is done sequentially.
The job can be executed then with one of the job manager's run() methods. Example:
MarkerAPI markerAPI = new MarkerAPI();
IJobManager jobManager = markerAPI.JobManager;
JobDefinition jobDef = jobManager.CreateNewJob( "Hello World" );

// Creating the job, add controllers and job elements etc.:
// ...

// Execute the job:
BaseJobExecutorProfile jobExecutorProfile = jobManager.GenerateJobExecutorProfile( typeof( OnHostJobExecutor ) );
try
{
  jobManager.RunAsync( jobDef, jobExecutorProfile ).Wait();
}
catch ( ApplicationException ex )
{
  throw new ApplicationException( $"Unable to execute job.", ex );
}
With plug-ins RAYGUIDE's functionality can be seamlessly extended by user developed components (see 3.4 Writing Plug-ins for Use in RAYGUIDE for details). This mechanism is used for job elements, executors and devices. As shown in the diagrams above, all of these classes are derived from class BasePlugin. It provides a derived class with the definition of some metadata information (as a label, e. g. "Rectangle", and an icon, shown in the RAYGUIDE GUI), and the interface delivers three method declarations which a plug-in has to implement:
Initialize: Is used, not surprisingly, to initialize the plug-in.
DoShowUI(String): This method should create and return an instance of a WPF user control which contains the specific GUI elements needed for configuring the plug-in. "Specific" GUI elements means that only the elements are needed which describe the plug-in's peculiarities. Example:
Rectangle Settings Dialog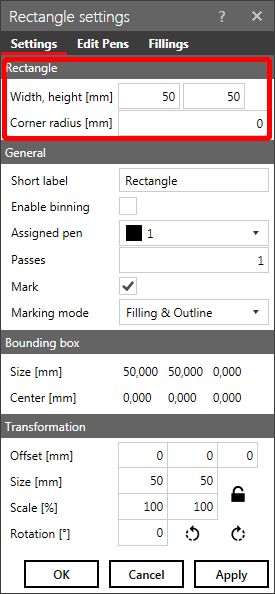
In case of our rectangle plug-in, only the GroupBox with the title "Rectangle", containing the rectangle's size and corner radius, needs to be implemented in the user control. All the other group boxes and the buttons, which are used by all of the plug-ins of this kind (derived from class BaseMarkableVectorGraphic in this case) are provided automatically by our framework. See 3.4 Writing Plug-ins for Use in RAYGUIDE for more details.
DoShowUICallback(PluginSettingsView): This method implements the code which is called when the dialog is closed; it is used to get the data out of it the user has typed in.