3.6 Embedding RAYGUIDE into own Applications |
The RAYGUIDE API does not only allow to integrate own plug-ins into RAYGUIDE as described in this former chapter, but also to do it the other way round and include RAYGUIDE into own applications. For this purpose, the API contains the wrapper class RayguideWrapper which can easily referenced in a dialog's XAML file to embed the whole RAYGUIDE user interface into it. Furthermore, there are the most important functions exposed, e. g. for loading a job, start marking, stop marking or manipulating RAYGUIDE's canvas in some way.
In this section we describe how to set up a Visual Studio project showing this.
In Visual Studio create a new project of type "WPF Application". Give it a meaningful name; in this tutorial, we will call it RayguideIncluder.
After creating the new project Visual Studio opens the main window's XAML file MainWindow.xaml. To make it containing the complete RAYGUIDE application the RAYGUIDE wrapper's XML namespace needs to be added in the XAML file's root element:
xmlns:wrapper="clr-namespace:RAYLASE.Marker.GUI.Wrapper;assembly=RAYLASE.Marker.GUI.Wrapper"
Into the grid we put the wrapper class:
<Grid>
  <wrapper:RayguideWrapper x:Name="Rayguide" Width="1000" />
</Grid>
It is important to define a width because the window will not be visible otherwise.
The markup is invalid now because needed references are missing.
As in the former samples mentioned the references are packed into a NuGet package. In this case add RAYLASE.Marker.GUI.Wrapper which wraps the complete GUI.
In the main window's code-behind file MainWindow.xaml.cs put two lines to its constructor:
public MainWindow()
{
    DataContext = this;
    InitializeComponent();
}
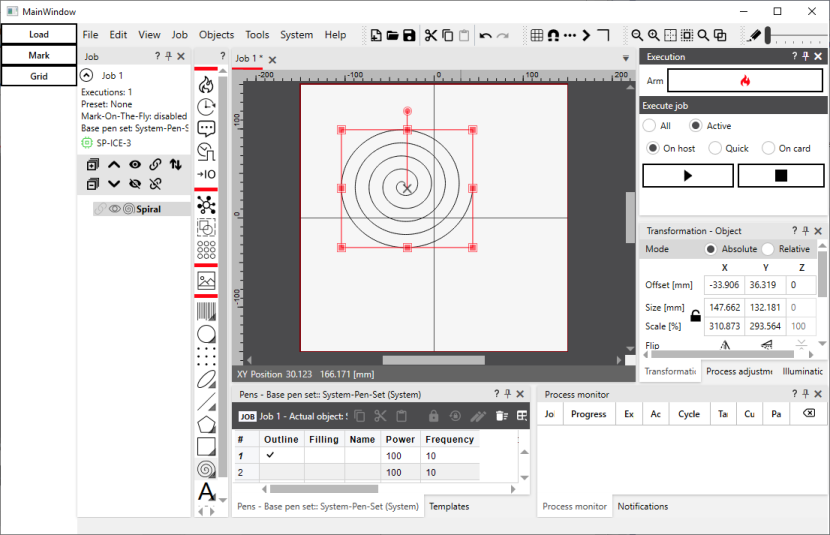
The application can be started now, RAYGUIDE will show up in the applications main window, but all icons are missing.
The RayguideWrapper exposes some of RAYGUIDE's most important functions so that they can easily be used.
To access these functions we add some buttons to our main window file MainWindow.xaml by replacing the Grid by two nested StackPanels:
<StackPanel Orientation="Horizontal">
  <StackPanel Width="102">
    <Button Content="Load" Click="OnLoadJob" />
    <Button Content="Mark" Click="OnMark" />
    <Button Content="Grid" Click="OnGrid" />
  </StackPanel>
  <wrapper:RayguideWrapper x:Name="Rayguide" ShutdownRequested="OnShutdownRequested" Width="1000" />
</StackPanel>
In the main window's code-behind file MainWindow.xaml.cs the following code can be added:
private void OnLoadJob( object sender, RoutedEventArgs e )
{
    Rayguide.OnLoadJob();
}
private void OnMark( object sender, RoutedEventArgs e )
{
    Rayguide.StartMark();
}
private void OnGrid( object sender, RoutedEventArgs e )
{
    Rayguide.OnGrid();
}
private void OnShutdownRequested( object sender, int e )
{
    Application.Current.Shutdown( e );
}
With that a job can be loaded, marked and the grid in the canvas can be switched on and off with the own controls. The application's main window will look like this now; on the left side is the StackPanel with the own buttons, on the right the embedded RAYGUIDE user interface can be seen:

The complete Visual Studio Solution is available in folder
C:\Program Files\RAYLASE\RAYGUIDE\SDK\SampleCode\Tutorials\RayguideIncluder\
If you want to use the RAYGUIDE plug-ins in your embedding application, make sure to copy the complete Plugins folder (removing not wanted plug-ins from it) into your application's binary folder.