3.4 Writing Plug-ins for Use in RAYGUIDE |
The RAYGUIDE API can be used to extend RAYGUIDE's functionality by writing own plug-ins. These plug-ins will be detected automatically by RAYGUIDE during its start-up phase and seamlessly integrated into its infrastructure. It is possible to add new job element types, devices or executors by deriving own classes from the corresponding base classes. Another kind of plug-ins are the Custom UI plug-ins which will be described in the next chapter.
A plug-in of the kind described here inherits automatically the basic GUI components which are already available in RAYGUIDE; only special controls, if needed, have to be added to a plug-in's settings dialog.
A plug-in of the kind described here is basically a class with the attribute [PluginMetadata]. If the class is derived from one of the API's base classes all the functionality already available in the base class can be used.
Several plug-ins can be combined in a managed DLL. How such an extension DLL is created will be explained from scratch in this chapter. We will write a plug-in which adds a new job object "Smiley" to the list of available job elements in RAYGUIDE.
In Visual Studio, create a new project of type "WPF Class library" and select the framework ".NET 8.0 (Long Term Support)". Give it a meaningful name, well-liked and exceptionally meaningful is always "MyPlugins" of course, which will be its name in this tutorial. The solution name is "Tutorials" in our case. Several plug-ins (i. e. classes) can be combined in a single DLL. (You will find the complete Visual Studio Solution in folder C:\Program Files\RAYLASE\RAYGUIDE\SDK\SampleCode\Tutorials\MyPlugins\.)
You are not quite free in naming the DLL: Its name must contain the string "Plugin" (upper or lowercase does not matter), because RAYGUIDE identifies the DLLs to be loaded at program start by this character sequence. Valid names are e. g. "testplugin.dll", "MyPlugins.dll", "MyPluginsForSomething.dll" or even "AppLugInSerial.dll" etc. |
Code based on our API can use .NET 8 or .NET Framework 4.8. We recommend .NET 8 because of better performance. But the RAYGUIDE GUI is still based on .NET Framework 4.8, and plug-ins must use it therefore as well. To force Visual Studio to create a .NET Framework 4.8 DLL additionally we have to add a new file Directory.Build.props in the solution folder:
<Project>
 <PropertyGroup>
   <LangVersion>latest</LangVersion>
 </PropertyGroup>
  <PropertyGroup>
    <TargetFrameworks>net48;net8.0-windows</TargetFrameworks>
    <CurrentPlatform>x86</CurrentPlatform>
    <CurrentPlatform Condition="'$(PROCESSOR_ARCHITECTURE)'=='AMD64' or '$(PROCESSOR_ARCHITEW6432)'=='AMD64'">AMD64</CurrentPlatform>
  </PropertyGroup>
</Project>
It is not necessary to add the file to the solution in Visual Studio, just put it with the
Windows Explorer into the solution folder alongside the file *.sln.
(In our case alongside Tutorials.sln.)
Not really necessary, but to clean-up the project file you can remove the line
<TargetFramework>net8.0-windows</TargetFramework>
from file MyPlugins.csproj. If the .NET Framework is not already installed
on your system you can download it from
here
The solution must be closed and loaded again after adding the file Directory.Build.props.
As described in section 2.4 Hello World Example we have to make sure that the NuGet package source C:\Program Files\RAYLASE\RAYGUIDE\SDK\NuGet is known to Visual Studio's NuGet Package Manager (if not already done). Then we can add our NuGet package "RAYLASE.Marker".
The class should be renamed to "Smiley", must have the attribute [PluginMetadata] and should be derived from the class BaseMarkableVectorGraphic which is the base class for all the graphical job element classes. If one would like to create a configuration dialog for a new laser controller e. g., the own class should be derived from class BaseLaserController instead.
[PluginMetadata("Smiley", "This job element creates a circle with eyes, nose and mouth.")]
class Smiley : BaseMarkableVectorGraphic
{
}
The first string argument is the name of the extension, the second one a description. The name will show up later when the mouse pointer is over the plug-in's icon in RAYGUIDE.
Visual Studio will now complain about missing methods because the base class is abstract. Let Visual Studio add them. The needed methods are:
protected override void BuildContent(): Creates the graphic, i. e. build the list of graphic commands for the smiley.
protected override Control DoShowUI(): Opens the settings dialog when the user double clicks on the object in the canvas or in the object tree.
protected override void DoShowUICallback(): This callback function is called when the user closes the settings dialog or presses its Apply button.
public override void Initialize(): Initializes the plug-in.
protected override void BuildContent():
In the first step just the head of our smiley, i. e. a circle, will be drawn:
protected override void BuildContent()
{
lock ( DirtyFlagLocker )
{
VectorGraphicEngine.AddLayer().AddPath( new dvec3( -Radius, 0, 0 ) ).ArcTo( 2 * Math.PI, dvec3.Zero );
}
}
The DirtyFlagLocker is a protected mutex object, which is defined in the class BaseJobElementSetup and is needed to make the code thread safe.
For the circle's radius a property and its backing field are to be added to the class:
private double _radius = 25000; // radius in micrometers => 25 mm here
public double Radius
{
    get => _radius;
    set => UpdateField( ref _radius, value );
}
public override void Initialize():
This method initializes the object and will just build its content, i. e. create the layer and path:
public override void Initialize()
{
    BuildContent();
}
override Control DoShowUI():
A job element needs to be configured with its settings dialog which is opened with this method:
protected override Control DoShowUI( JobElementHolder jobElementHolder, string id )
{
    SmileySettingsView settingsView = new()
    {
        Radius = Radius
    };
    return settingsView;
}
The Control class can be found in .NET's PresentationFramework.dll. The class SmileySettingsView is a WPF user control which will be created in the next section.
protected override void DoShowUICallback():
This callback function is called when the user closes the settings dialog or presses the Apply button and gets the modified data (here: the radius) back.
protected override void DoShowUICallback( JobElementHolder jobElementHolder, PluginSettingsView settingsView )
{
    if ( settingsView.CustomSettingsView is not SmileySettingsView smileySettingsView  )
        return;
    Radius = smileySettingsView.Radius;
}
Adding a WPF user control:
Thanks to the RAYGUIDE API all general settings of a job element like label, binning parameters, the assigned pen etc. are already available in our new smiley element and even configurable by the settings dialog. The only thing still to do is to add a user control with the specific property of the new job element. In our case this is the radius of our smiley.
In Visual Studio add a new item "User Control (WPF)" to the project and name the file SmileySettingsView.xaml.
Modifying the XAML file:
The class type should be changed from UserControl to our BaseBindableView which is derived from UserControl and adds some convenience functionality for tracking property changes.
To use the general dialog elements already available for job elements in RAYGUIDE, the user control's name scope needs to be set to "Root".
Due to a strange restriction in Microsoft's XAML parser it is not possible to set
the name scope to anything, if the solution, the project and the class defined in the XAML file
have the same name. You will get an error
|
To keep things easy we replace the original Grid by a StackPanel, just containing a Label and our radius as TextBox. We bind it to our Radius property. The unit can be converted from millimeters in the GUI into micrometers used in the API automatically by our DistanceConverter. The whole file looks like this:
<gui:BaseBindableView x:Class="MyPlugins.SmileySettingsView"
             xmlns="http://schemas.microsoft.com/winfx/2006/xaml/presentation"
             xmlns:x="http://schemas.microsoft.com/winfx/2006/xaml"
             xmlns:mc="http://schemas.openxmlformats.org/markup-compatibility/2006"
             xmlns:d="http://schemas.microsoft.com/expression/blend/2008"
             xmlns:local="clr-namespace:MyPlugins"
             xmlns:gui="clr-namespace:RAYLASE.Shared.GUI;assembly=RAYLASE.Shared"
             mc:Ignorable="d"  Name="Root"
             d:DesignHeight="450" d:DesignWidth="800">
  <StackPanel Orientation="Horizontal">
    <Label>Radius</Label>
    <TextBox Text="{Binding Radius, UpdateSourceTrigger=PropertyChanged, ElementName=Root, Converter={StaticResource DistanceConverter}}"/>
  </StackPanel>
</gui:BaseBindableView>
Modifying the code-behind file:
In the code-behind file SmileySettingsView.xaml.cs the radius property is to be added. BaseBindableView has provided a SetProperty method to raise a property changed event so that the displayed value in the dialog is updated.
using RAYLASE.Shared.GUI;

namespace MyPlugins
{
    /// <summary>
    /// Interaction logic for SmileySettingsView.xaml
    /// </summary>
    public partial class SmileySettingsView : BaseBindableView
    {
        private double _radius;

        public double Radius
        {
            get => _radius;
            set => SetProperty( ref _radius, value );
        }

        public SmileySettingsView()
        {
            InitializeComponent();
        }
    }
}
The plug-in is compilable now. But for integration into RAYGUIDE an additional class is necessary to tell it which plug-ins are contained in the DLL. This class' name must be "PluginsProvider" and contains just a list of all plug-ins; in our case it is only the type "Smiley".
So, add a new public class named "PluginsProvider" to the project and type in this code:
using RAYLASE.Marker.Plugin;

namespace MyPlugins
{
    public class PluginsProvider : IPluginsProvider
    {
        public IList<Type> PluginTypes => new List<Type>() { typeof( Smiley ) };
    }
}
Now the plug-in is finished. To be found by RAYGUIDE the DLL must be copied into the installation's sub folder C:\Program Files\RAYLASE\RAYGUIDE\bin\Plugins\ (if not changed during the installation). Make sure to copy the .NET Framework 4.8 DLL and not the .NET 8 DLL which are both compiled by the solution.
(Be aware of the additional condition already mentioned above: The DLL's name must contain the string "plugin" to be identified by RAYGUIDE as a plug-in.)
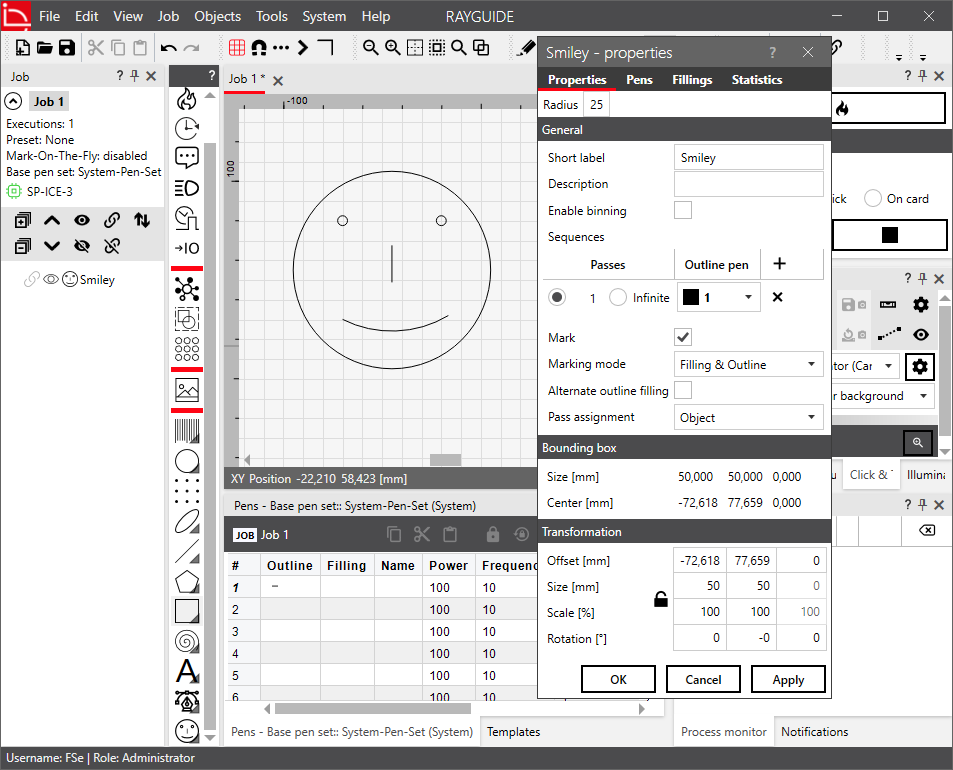
But, the new job element should be shown in RAYGUIDE with an icon of course - in the current state only a blank, quadratic area could be seen in the list of available job elements. Adding an icon is easy: Create a SVG file (scalabe vector graphic), name it the same as your plug-in class ("Smiley.svg" in this case) and copy the file into the folder C:\Programdata\RAYLASE\RAYGUIDE\Resources\Icons\. (Attention: This folder is normally hidden.) We have prepared this extraordinary artistic SVG file for you already; copy it now from C:\Program Files\RAYLASE\RAYGUIDE\SDK\SampleCode\Tutorials\MyPlugins\ into the mentioned folder and start RAYGUIDE to show the result: The smiley appears now in the job object list, and it can be added as a job element to the job; the circle's radius is adjustable in the settings dialog.
When creating the SVG file attention must be payed to the scaling. If you create the file with the Open Source vector graphic application Inkscape e. g., good results are achieved if the canvas has a size of 10 mm x 10 mm. |
Just for the sake of completeness the circle should be turned into a smiley finally and given it a face. Change the code in the BuildContent() method to this:
protected override void BuildContent()
{
    lock ( DirtyFlagLocker )
    {
        double noseLen = Radius / 4;
        dvec3 eyeRadius = new ( Radius / 20, 0, 0 );
        dvec3 leftEyeCenter = new ( -Radius / 2, Radius / 2, 0 );
        dvec3 rightEyeCenter = new ( Radius / 2, Radius / 2, 0 );
        dvec3 leftEyePos = leftEyeCenter - eyeRadius;
        dvec3 rightEyePos = rightEyeCenter - eyeRadius;
        dvec3 nosePos = new ( 0, -noseLen / 2, 0 );
        dvec3 mouthPos = new ( -Radius / 2, -Radius / 2, 0 );
        dvec3 mouthCenter = new ( 0, Radius / 2, 0 );
        VectorGraphicLayer layer = VectorGraphicEngine.AddLayer();
        layer.AddPath( new ( -Radius, 0, 0 ) ).ArcTo( 2 * Math.PI, dvec3.Zero ); // face
        layer.AddPath( leftEyePos ).ArcTo( 2 * Math.PI, leftEyeCenter ); // left eye
        layer.AddPath( rightEyePos ).ArcTo( 2 * Math.PI, rightEyeCenter ); // right eye
        layer.AddPath( nosePos ).LineTo( new dvec3( 0, noseLen, 0 ) ); // nose
        layer.AddPath( mouthPos ).ArcTo( 1, mouthCenter ); // mouth
    }
}
All coordinates and lengths are relative to the radius so that the smiley can be rescaled without problems.
The application's main window and the smiley's settings dialog will look like this now if a Smiley object is added to the canvas:
If there are several Smileys in the job, it could be useful to set their radii to the very same value at the same time. This can be achieved by changing the radius to a so called common property. Additionally some other information can be given to the user in the settings dialog when using common properties; see below.
When multiselecting markable job elements of the same kind in the job tree, the context menu offers the item Common properties..., showing a simplified settings dialog that contains only the common properties. If several ellipses are selected e. g., the context menu and the settings dialog may look like this:
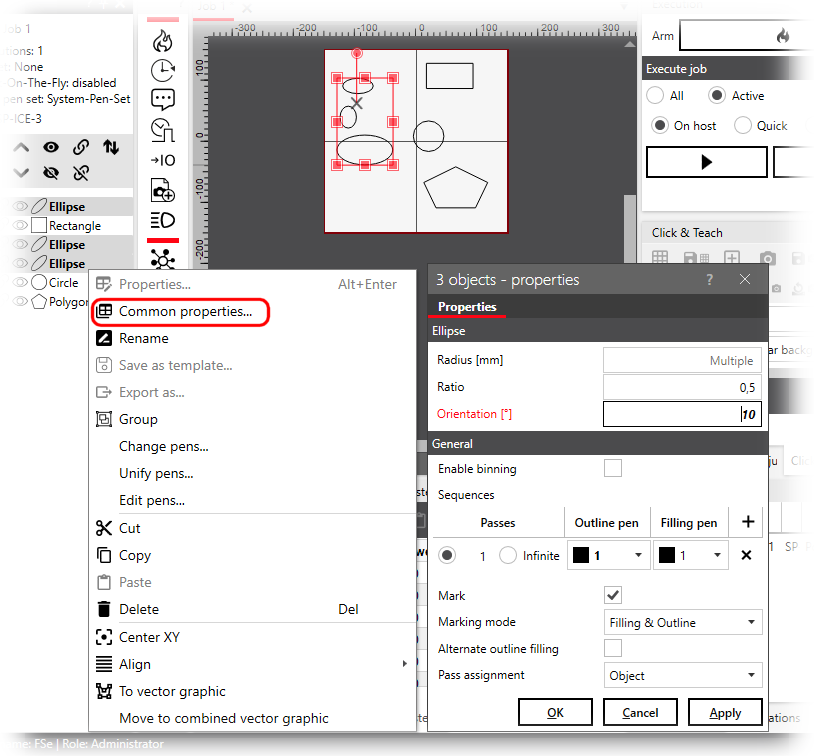
The settings dialog shows in the Radius field with the Mutliple watermark, that the radii of the selected ellipses are not the same for all of them. And the red color of the Orientation label means, that its value has been changed by the user and is dirty therefore. When pressing Apply or OK all radii and ratios will be kept as they are, but the orientation of all three selected ellipses will be set to 10° in this example.
In difference to that, when showing the common properties dialog of several Smileys, only the General settings will be displayed currently, but not the radius, because it is not defined as a common property. To do this it must be put, together with all other common properties, into a "mask". This is basically a dictionary with the property name as key and a flag as value reflecting the property's status, i. e. "initialized", "multiple" or "dirty"; see class PropertyMask and the enumeration MultipleValuesFlag.
In the following sections the Smiley will get a second property EyeScaleFactor, and both properties will be turned into common ones with all the features known from the ellipse properties.
The complete project can be found in folder C:\Program Files\RAYLASE\RAYGUIDE\SDK\SampleCode\Tutorials\MyPlugins2\.
Copying and renaming the project:
To preserve the current project, we should copy the project folder MyPlugins to a new folder MyPlugins2, open the project in Visual Studio, and rename the project and the name space to "MyPlugins2" as well.
Adding a new property EyeScaleFactor:
To demonstrate that it is possible to change properties independently from each other, the new property EyeScaleFactor is added to the Smiley class:
private double _radius = 25000; // radius in micrometers => 25 mm here
private double _eyeScaleFactor = 0.05; // the eyes are smaller by this factor than the head

public double Radius
{
    get => _radius;
    set => UpdateField( ref _radius, value );
}

public double EyeScaleFactor
{
    get => _eyeScaleFactor;
    set => UpdateField( ref _eyeScaleFactor, value );
}
The EyeScaleFactor is the factor the radius of the Smiley's head is multiplied with to get the radius of the eyes. Their size can be adjusted in this way without changing the size of the Smiley's head.
Putting the properties into the list of common properties:
To add properties into the list of properties to be shown in the common properties dialog, two methods in class BaseJobElement (from which Smiley is derived) must be overridden. Add them to Smiley.cs:
protected override PropertyMask DoGetUIMask()
{
    return new MarkableJobElementMask();
}

protected override void DoCompareWith( JobElementHolder jobElementHolder, JobElementHolder other, PropertyMask mask )
{
    if ( mask is MarkableJobElementMask && other.JobElement is Smiley otherJobElement )
    {
        string fullPropertyName;
        MultipleValuesFlag flag;

        fullPropertyName = mask.GetPropertyFullName( typeof( SmileySettingsView ), nameof( SmileySettingsView.Radius ) );
        flag = mask.PropertyMap[fullPropertyName];
        if ( !flag.HasFlag( MultipleValuesFlag.Multiple ) && Math.Abs( Radius - otherJobElement.Radius ) >= 5e-7 )
            mask.AddFlag( fullPropertyName, MultipleValuesFlag.Multiple );

        fullPropertyName = mask.GetPropertyFullName( typeof( SmileySettingsView ), nameof( SmileySettingsView.EyeScaleFactor ) );
        flag = mask.PropertyMap[fullPropertyName];
        if ( !flag.HasFlag( MultipleValuesFlag.Multiple ) && Math.Abs( EyeScaleFactor - otherJobElement.EyeScaleFactor ) >= 5e-7 )
            mask.AddFlag( fullPropertyName, MultipleValuesFlag.Multiple );
    }
}
Both methods are called while the common settings dialog is created. DoGetUIMask() changes the mask's type into MarkableJobElementMask and DoCompareWith() checks, if two concurrently selected job elements are of the same type, and puts the properties into the mask dictionary. The flag reflects the state the property has and will be set to Multiple if the values of two objects differ (and to Dirty later when the user changes a value).
Modifying the DoShowUI() method:
The settings dialog must know about the properties to be shown. Therefore the DoShowUI() method is to be changed and overloaded to supply it with the mask:
protected override Control DoShowUI( JobElementHolder jobElementHolder, string id ) => DoShowUI( jobElementHolder, id, null );
protected override Control DoShowUI( JobElementHolder jobElementHolder, string id, PropertyMask mask )
{
    SmileySettingsView settingsView = new SmileySettingsView
    {
        Mask = mask, // make sure to set the mask as first element
        Radius = Radius,
        EyeScaleFactor = EyeScaleFactor
    };
    return settingsView;
}
Make sure to set the Mask property first, because the setters of the other properties try to access it. (The missing Mask property in SmileySettingsView will be added later.)
Modifying the DoShowUICallback() method:
In this method is checked which property has been changed by the user reading the Mask's dictionary. Only the parameters with a "dirty" flag will be updated. This flag is set by the settings dialog during the user interaction, see below.
protected override void DoShowUICallback( JobElementHolder jobElementHolder, PluginSettingsView settingsView )
{
    if ( !( settingsView.CustomSettingsView is SmileySettingsView smileySettingsView ) )
        return;

    PropertyMask mask = smileySettingsView.Mask as MarkableJobElementMask;
    MultipleValuesFlag radiusFlag = MultipleValuesFlag.None;
    MultipleValuesFlag eyeScaleFactorFlag = MultipleValuesFlag.None;

    if ( mask != null )
    {
        Type type = typeof( SmileySettingsView );

        string fullPropertyName = mask.GetPropertyFullName( type, nameof( SmileySettingsView.Radius ) );
        radiusFlag = mask.PropertyMap[fullPropertyName];

        fullPropertyName = mask.GetPropertyFullName( type, nameof( SmileySettingsView.EyeScaleFactor ) );
        eyeScaleFactorFlag = mask.PropertyMap[fullPropertyName];
    }

    if ( mask == null || radiusFlag.HasFlag( MultipleValuesFlag.Dirty ) )
        Radius = smileySettingsView.Radius ?? _radius;

    if ( mask == null || eyeScaleFactorFlag.HasFlag( MultipleValuesFlag.Dirty ) )
        EyeScaleFactor = smileySettingsView.EyeScaleFactor ?? _eyeScaleFactor;
}
Changing the settings dialog:
The content of the XAML file should be replaced by this:
<gui1:BaseSettingsView x:Class="MyPlugins2.SmileySettingsView"
  xmlns="http://schemas.microsoft.com/winfx/2006/xaml/presentation"
  xmlns:x="http://schemas.microsoft.com/winfx/2006/xaml"
  xmlns:mc="http://schemas.openxmlformats.org/markup-compatibility/2006"
  xmlns:d="http://schemas.microsoft.com/expression/blend/2008"
  xmlns:mah="http://metro.mahapps.com/winfx/xaml/controls"
  xmlns:qc="http://QuickConverter.CodePlex.com/"
  xmlns:local="clr-namespace:MyPlugins2"
  xmlns:gui1="clr-namespace:RAYLASE.Marker.Common.GUI;assembly=RAYLASE.Marker.Common"
  xmlns:gui2="clr-namespace:RAYLASE.Marker.Common.GUI;assembly=RAYLASE.Marker.Common"
  mc:Ignorable="d" d:DataContext="{d:DesignData Smiley}" x:Name="Root">

  <UserControl.Resources>
    <gui1:PropertyMaskConverter x:Key="MaskConverter" Namespace="MyPlugins2.SmileySettingsView" />

    <Style TargetType="{x:Type mah:NumericUpDown}" BasedOn="{StaticResource Rayguide.Styles.NumericUpDown.PenDefault}" x:Key="NumericUpDownDirty">
      <Setter Property="mah:TextBoxHelper.Watermark" Value="Multiple" />
      <Style.Triggers>
        <DataTrigger Binding="{Binding (gui2:ParameterHolder.ParameterValue), Converter={qc:QuickConverter '$P != null ## $P.HasFlag( MultipleValuesFlag.Dirty )'}, RelativeSource={RelativeSource Self}}" Value="True">
          <Setter Property="FontWeight" Value="Bold" />
          <Setter Property="FontStyle" Value="Italic" />
        </DataTrigger>
      </Style.Triggers>
    </Style>

    <Style TargetType="{x:Type Label}" BasedOn="{StaticResource {x:Type Label}}" x:Key="LabelDirty">
      <Style.Triggers>
        <DataTrigger Binding="{Binding (gui2:ParameterHolder.ParameterValue), Converter={qc:QuickConverter '$P != null ## $P.HasFlag( MultipleValuesFlag.Dirty )'}, RelativeSource={RelativeSource Self}}" Value="True">
          <Setter Property="Foreground" Value="{StaticResource MahApps.Brushes.Highlight}" />
        </DataTrigger>
      </Style.Triggers>
    </Style>
  </UserControl.Resources>

  <Grid>
    <Grid.RowDefinitions>
      <RowDefinition/>
      <RowDefinition/>
    </Grid.RowDefinitions>
    <Grid.ColumnDefinitions>
      <ColumnDefinition/>
      <ColumnDefinition/>
    </Grid.ColumnDefinitions>
    <Label Grid.Row="0" Grid.Column="0"
         Content="Radius" ContentStringFormat="{}{0} [mm]"
         gui2:ParameterHolder.ParameterValue="{Binding Mask, Converter={StaticResource MaskConverter}, ConverterParameter=Radius}"
         Style="{StaticResource LabelDirty}" />
    <mah:NumericUpDown Grid.Row="0" Grid.Column="1"
        Value="{Binding Radius, UpdateSourceTrigger=PropertyChanged, ElementName=Root, Converter={StaticResource DistanceConverter}}"
        Minimum="0"
        gui2:ParameterHolder.ParameterValue="{Binding Mask, ElementName=Root, Converter={StaticResource MaskConverter}, ConverterParameter=Radius}"
        Style="{StaticResource NumericUpDownDirty}"/>
    <Label Grid.Row="1" Grid.Column="0"
        Content="Eye scale factor"
        ContentStringFormat="{}{0}"
        gui2:ParameterHolder.ParameterValue="{Binding Mask, Converter={StaticResource MaskConverter}, ConverterParameter=EyeScaleFactor}"
        Style="{StaticResource LabelDirty}" />
    <mah:NumericUpDown Grid.Row="1" Grid.Column="1"
        Value="{Binding EyeScaleFactor, UpdateSourceTrigger=PropertyChanged, ElementName=Root}"
        Minimum="0" Interval="0.01"
        gui2:ParameterHolder.ParameterValue="{Binding Mask, ElementName=Root, Converter={StaticResource MaskConverter}, ConverterParameter=EyeScaleFactor}"
        Style="{StaticResource NumericUpDownDirty}" />
  </Grid>

</gui1:BaseSettingsView>
The major changes are:
Some resources are implemented to control the optical sugar, i. e. two data triggers change the style of a dirty property to bold and italic and the color of its label to red. But the important thing is the MaskConverter which sets the values in the Mask dictionary's property elements.
The former StackPanel is replaced by a Grid, and the new property EyeScaleFactor is added. Both properties are no TextBoxes now but NumericUpDown controls provided by the MahApps.Metro package. The control allows to change a value comfortable with the mouse wheel.
The magic of the common properties is done by the binding to the Mask; a property's value of a dictionary element is set to "dirty" in case of a change, and this flag will be evaluated when pressing the Apply or OK button.
Some namespaces are added.
Changing the code-behind file:
The code-behind file should look like this:
using RAYLASE.Marker.Common.GUI;

namespace MyPlugins2
{
    /// <summary>
    /// Interaction logic for SmileySettingsView.xaml
    /// </summary>
    public partial class SmileySettingsView : BaseSettingsView
    {
        private double? _radius;
        private double? _eyeScaleFactor;

        public double? Radius
        {
            get => GetMaskedProperty( _radius, GetType() );
            set => SetMaskedProperty( ref _radius, value, GetType() );
        }

        public double? EyeScaleFactor
        {
            get => GetMaskedProperty( _eyeScaleFactor, GetType() );
            set => SetMaskedProperty( ref _eyeScaleFactor, value, GetType() );
        }

        public SmileySettingsView()
        {
            DataContext = this;
            InitializeComponent();
        }
    }
}
The setters and getters are calling methods implemented in BaseSettingsView. They are responsible for handling the flag used in the Mask's dictionary.
Seeing the result:
Put the compiled DLL then into the Plugins folder again as described above, and the two properties will be shown when opening the common properties dialog:
