3.5 Writing Custom UI Plug-ins and Using Events |
In difference to the plug-ins described in the
last chapter
there is another kind of plug-ins, the so-called custom UI plug-ins
.
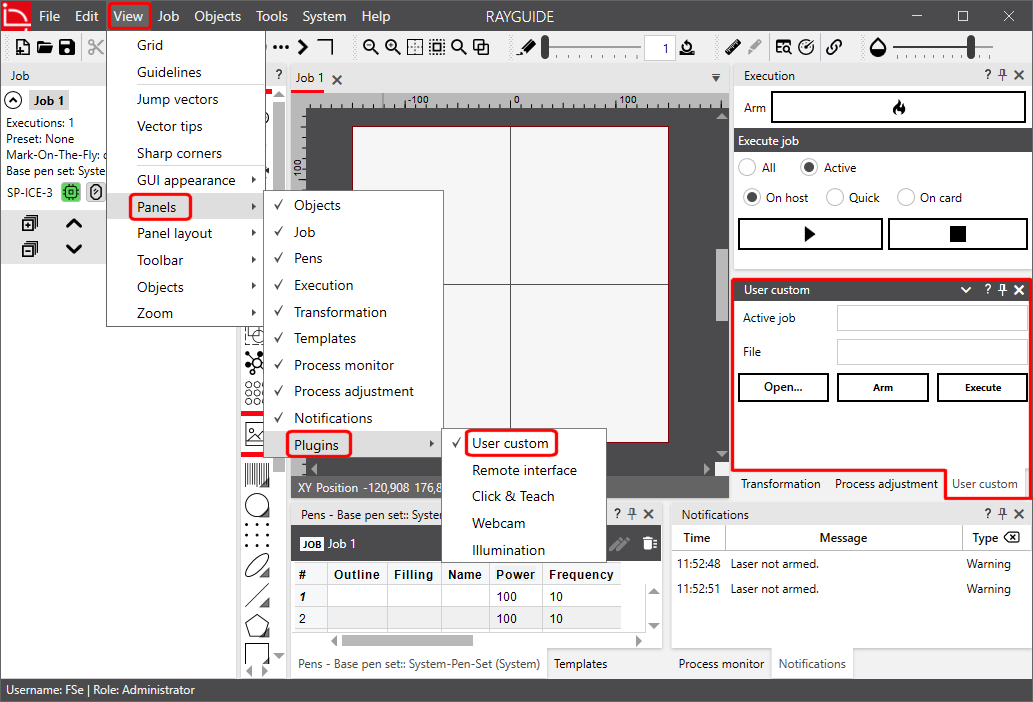
RAYGUIDE is able to load custom UI plug-ins at program start and
shows their user interface in separate UI panels when their menu items
View/Panels/Plugins/User Custom are activated (all custom UI plug-ins will
appear with the same name there).
In this chapter an example is described, how to implement a custom UI plug-in which is able to send commands to RAYGUIDE by means of RAYGUIDE events. To synchronize the plug-in's GUI with RAYGUIDE's GUI the plug-in gets informed about changes also by means of events fired by RAYGUIDE.
In RAYGUIDE a set of events is defined which are used for the communication between the GUI application modules. These events can be used by an API user as well to trigger actions. Also it is possible to receive events and get informed about RAYGUIDE's internal status changes.
The events are in fact meant for internal use, and there is no reliable error detection mechanism when sending events from the outside into RAYGUIDE with wrong parameters. It may even happen that RAYGUIDE is in a state at a time, where it is not able to handle an event in a proper way. The events have been made public only for convenience because some simple tasks could be solved easier in this way. Use this interface on your own risk ... |
For sending and receiving events, RAYGUIDE uses the Event Aggregator provided by the Prism framework. The event aggregator allows different modules to communicate without having knowledge of each other. Each module needs to have a dependency to the event aggregator instead, and can "publish" (i. e. trigger) events to other modules and "subscribe" for getting events from other modules.
The events used in RAYGUIDE's GUI are located in file RAYLASE.Marker.GUI.Events.dll; a short description of them is given in the namespace RAYLASE.Marker.GUI.Events. For example, to fire the event ArmLaserEvent to arm the laser with RAYGUIDE, one can write
EventAggregator.GetEvent<ArmLaserEvent>().Publish()
RAYGUIDE has a naming convention: The events for commanding RAYGUIDE to perform some action are named like a method and consist of a verb and an object, e. g. "ArmLaserEvent" or "RefreshJobSettingsEvent". The events informing other modules about status changes consist of a subject and a verb in simple past, e. g. "LaserArmedEvent" or "JobChangedEvent".
E. g., to subscribe for receiving the event JobChangedEvent, which is fired when a job is created, loaded or came into the foreground because the user changes the job tab, is done with these lines:
...
EventAggregator.GetEvent<JobChangedEvent>().Subscribe( OnJobChanged );
...
private void OnJobChanged()
{
// handle the event:
...
}
OnJobChanged() is a user defined callback method of type void with no parameters which is called when the event is received.
If a subscriber is no longer interested in getting the event, it can be removed from the list of addressees with the corresponding Unsubscribe() method.
Some events need a parameter when fired or received. For example, to let RAYGUIDE load a job file using the command event OpenJobEvent, a parameter with the file name is needed and handed over to the Publish() method:
EventAggregator.GetEvent<OpenJobEvent>().Publish( "C:\\tmp\\test.rg" );Only a single parameter is allowed. If more than one parameter is needed, the parameters have to be put into a Tuple. See the summary in RAYLASE.Marker.GUI.Events for details.
To receive an event with a parameter, the parameter can be picked up as parameter in the user defined callback method. For example, the event ActiveJobChangedEvent informs about a new active job in case the user has loaded a job or changed the job tab in the GUI:
...
EventAggregator.GetEvent<ActiveJobChangedEvent>().Subscribe( OnActiveJobChanged );
...
private void OnActiveJobChanged(JobDefinition activeJob)
{
// do something with the parameter:
...
}
Due to a common restriction in graphical user environments all updating of GUI elements must be done in the main GUI thread. Most of RAYGUIDE's commanding events are affecting the GUI and cannot be triggered directly therefore because the custom UI plug-in is executed in its own thread; RAYGUIDE would throw an exception. To overcome this problem the application dispatcher has to be used which dispatches the call asynchronously to the GUI thread. Arming the laser must therefore in fact be done in a little more complicated way then described above:
Application.Current.Dispatcher?.BeginInvoke( (Action)( () => { EventAggregator.GetEvent<ArmLaserEvent>().Publish(); } ) );These steps are the same as in the previous chapter (3.4 Writing Plug-ins for Use in RAYGUIDE). So, in Visual Studio, create a new project of type "WPF Class library", we give it the name "CustomUIPlugin" here; select the framework ".NET 8.0 (Long Term Support)".
If you are using the same solution as in the previous chapter the file Directory.Build.props is already there. Otherwise create this file again and put it into the solution folder to force Visual Studio to create a .NET Framework 4.8 DLL additionally:
<Project>
 <PropertyGroup>
   <LangVersion>latest</LangVersion>
 </PropertyGroup>
  <PropertyGroup>
    <TargetFrameworks>net48;net8.0-windows</TargetFrameworks>
    <CurrentPlatform>x86</CurrentPlatform>
    <CurrentPlatform Condition="'$(PROCESSOR_ARCHITECTURE)'=='AMD64' or '$(PROCESSOR_ARCHITEW6432)'=='AMD64'">AMD64</CurrentPlatform>
  </PropertyGroup>
</Project>(The complete source code of this example can be found in folder C:\Program Files\RAYLASE\RAYGUIDE\SDK\SampleCode\Tutorials\CustomUIPlugin\.)
As before you are not quite free in naming the DLL: Its name must contain the string "Plugin" (upper or lowercase does not matter), because RAYGUIDE identifies the DLLs to be loaded at program start by this character sequence. Valid names are e. g. "testplugin.dll", "CustomUIPlugin.dll", "MyPluginsForSomething.dll" or even "AppLugInSerial.dll" etc. |
As described in section 2.4 Hello World Example we have to make sure that the NuGet package source C:\Program Files\RAYLASE\RAYGUIDE\SDK\NuGet is known to Visual Studio's NuGet Package Manager (if not already done). Here we need two packages:
RAYLASE.Marker
RAYLASE.Marker.CustomUiPlugins
Add a New item... of type "User Control (WPF)" to the project. We name it "CustomUIView.xaml" here.
The plug-in will be a panel containing basically three buttons for loading a job, arming the laser and executing the current job. Additionally there is a text box where the file name of the file to be loaded can be entered (to demonstrate how a parameter is put into an event) and a text box containing the name of the current job (to demonstrate how a parameter is extracted from an event). See the screen shot below.
The XAML file is this:
<UserControl x:Class="CustomUIPlugin.CustomUIView"
             xmlns="http://schemas.microsoft.com/winfx/2006/xaml/presentation"
             xmlns:x="http://schemas.microsoft.com/winfx/2006/xaml"
             xmlns:mc="http://schemas.openxmlformats.org/markup-compatibility/2006"
             xmlns:d="http://schemas.microsoft.com/expression/blend/2008"
             xmlns:local="clr-namespace:CustomUIPlugin"
             mc:Ignorable="d"
             d:DesignHeight="450" d:DesignWidth="800">
  <StackPanel>
    <Grid>
      <Grid.RowDefinitions>
        <RowDefinition/>
        <RowDefinition/>
        <RowDefinition/>
      </Grid.RowDefinitions>
      <Grid.ColumnDefinitions>
        <ColumnDefinition SharedSizeGroup="A"/>
        <ColumnDefinition SharedSizeGroup="A"/>
        <ColumnDefinition SharedSizeGroup="A"/>
      </Grid.ColumnDefinitions>
      <Label Grid.Row="0" Grid.Column="0" Content="Active job" Margin="4"/>
      <TextBox Grid.Row="0" Grid.Column="1" Grid.ColumnSpan="2" Text="{Binding ActiveJob}" IsReadOnly="True" Margin="4"/>
      <Label Grid.Row="1" Grid.Column="0" Content="File" Margin="4"/>
      <TextBox Grid.Row="1" Grid.Column="1" Grid.ColumnSpan="2" Text="{Binding FileName}" Margin="4"/>
      <Button Grid.Row="2" Grid.Column="0"  Content="Open..." Click="OnOpenButtonClick" Margin="4"/>
      <ToggleButton Name="_armButton" Grid.Row="2" Grid.Column="1" Content="Arm" Click="OnArmButtonClick" Margin="4"/>
      <ToggleButton Name="_execButton" Grid.Row="2" Grid.Column="2"  Content="Execute" Click="OnExecuteButtonClick" Margin="4"/>
    </Grid>
  </StackPanel>
</UserControl>
The file Class1.cs, automatically created by Visual Studio, can be deleted.
The implementation is done in the view's code-behind file CustomUIView.xaml.cs.
Since we want to update the field with the current job's name, the class is not only derived from the UserControl class but implements the INotifyPropertyChanged interface (see here for details.
public partial class CustomUIView : UserControl, INotifyPropertyChanged
Let Visual Studio implement the interface (the line
public event PropertyChangedEventHandler PropertyChanged;
will be added to the class). To get informed about property changes the method NotifyPropertyChanged() is necessary:
protected virtual void NotifyPropertyChanged( [CallerMemberName] string propertyName = "" )
{
    PropertyChanged?.Invoke( this, new PropertyChangedEventArgs( propertyName ) );
}
The two text properties we are using are the FileName that contains the path and name of the file to be opened ...
public string FileName
{
    get => _fileName;
    set
    {
        _fileName = value;
        NotifyPropertyChanged();
    }
}
private string _fileName;
... and the ActiveJob which is updated when the user loads a job in RAYGUIDE or changes the job tab:
public string ActiveJob
{
    get => _activeJob;
    set
    {
        _activeJob = value;
        NotifyPropertyChanged();
    }
}
private string _activeJob;
Add these three stubs for the button handlers referenced in the XAML file:
private void OnOpenButtonClick( object sender, RoutedEventArgs e ) {}
private void OnArmButtonClick( object sender, RoutedEventArgs e ) {}
private void OnExecuteButtonClick( object sender, RoutedEventArgs e ) {}
The project does not do anything now but is compilable (after adding the missing using statements as suggested by Visual Studio) and can be integrated into RAYGUIDE already.
The plug-in is compilable now. But for integration into RAYGUIDE an additional class is necessary to tell it which plug-ins are contained in the DLL. This classes name must be "CustomUIsProvider" and contains just a list of all plug-ins; in our case it is only the type "CustomUIView".
So, add a new public class named "CustomUIsProvider" to the project and type in this code:
using RAYLASE.Marker.GUI.Common;

namespace CustomUIPlugin
{
    public class CustomUIsProvider : ICustomUIsProvider
    {
        public IList<(string Label, Type Type, string HelpID)> CustomUITypes { get; } = [("User custom", typeof( CustomUIView ), string.Empty)];
    }
}
When RAYGUIDE is started the next time, the plug-in will be loaded and can be shown in the GUI as a separate panel. To make it visible the menu item View/Panels/Plugins/User custom is used:
In the next step we replace the button handler stubs by the real methods. The first button loads the file given in the File text box by means of event OpenJobEvent:
private void OnOpenButtonClick( object sender, RoutedEventArgs e )
{
    Application.Current.Dispatcher?.BeginInvoke( (Action)( () => { _eventAggregator.GetEvent<OpenJobEvent>().Publish( (FileName, true) ); } ) );
}
As you can see there is not so much to be done. The event is just fired with the file name as parameter, and RAYGUIDE will do the rest. If the text box is empty RAYGUIDE will show a file select dialog. As mentioned above there is no elaborated error handling available when using events. If the given file name does not exist, RAYGUIDE will show a rather unspecific exception message. To detect an error you could wait with a timeout for an event which is sent by RAYGUIDE as response; in this case RAYGUIDE will fire the event OnActiveJobChanged, but only if the loading has been successful.
The next button arms or disarms the laser, dependent on the current state of the button, using the events ArmLaserEvent and DisarmLaserEvent:
private void OnArmButtonClick( object sender, RoutedEventArgs e )
{
    if ( (bool)_armButton.IsChecked )
        Application.Current.Dispatcher?.BeginInvoke( (Action)( () => { _eventAggregator.GetEvent<ArmLaserEvent>().Publish(); } ) );
    else
        Application.Current.Dispatcher?.BeginInvoke( (Action)( () => { _eventAggregator.GetEvent<DisarmLaserEvent>().Publish(); } ) );
}
And, finally, here is the similar code for executing and aborting the job with the events: StartJobEvent and AbortJobEvent:
private void OnExecuteButtonClick( object sender, RoutedEventArgs e )
{
    if ( (bool)_execButton.IsChecked )
        Application.Current.Dispatcher?.BeginInvoke( (Action)( () => { _eventAggregator.GetEvent<StartJobEvent>().Publish(); } ) );
    else
        Application.Current.Dispatcher?.BeginInvoke( (Action)( () => { _eventAggregator.GetEvent<AbortJobEvent>().Publish(); } ) );
}
The missing elements Visual Studio is complaining about now will be added later.
Our plug-in has a toggle button for arming the laser. A similar button is available in RAYGUIDE. When pressing the plug-in's arm button and sending the event, RAYGUIDE reacts and its arm button will be toggled as well. Conversely, when pressing the arm button in RAYGUIDE, the plug-in's arm button should be toggled.
This can be achieved by subscribing for the needed events, at least if such an event is available in RAYGUIDE. Fortunately this is the case for the events needed in this example: We need to get informed when the active job changes, when the user arms or disarms the laser or when the execution is started or ended. The RAYGUIDE events doing this are:
We subscribe for receiving these events in the class's constructor; replace the current one by this code:
private readonly IEventAggregator _eventAggregator;
/// <summary>
/// The constructor gets Prism's event aggregator to handle RAYGUIDE
/// events and subscribes for the events the plug-in is interested in.
/// </summary>
/// <param name="eventAggregator">Prism's event aggregator.</param>
public CustomUIView( IEventAggregator eventAggregator )
{
    DataContext = this;
    InitializeComponent();
    _eventAggregator = eventAggregator;
    _eventAggregator.GetEvent<ActiveJobChangedEvent>().Subscribe( OnActiveJobChanged );
    _eventAggregator.GetEvent<LaserArmedEvent>().Subscribe( OnLaserArmed );
    _eventAggregator.GetEvent<JobStartedEvent>().Subscribe( OnJobStarted );
    _eventAggregator.GetEvent<JobFinishedEvent>().Subscribe( OnJobFinished );
    _eventAggregator.GetEvent<JobAbortedEvent>().Subscribe( OnJobAborted );
}
All of these events transfer parameters which are used to update the plug-in's GUI. This is done by setting the content of the string property ActiveJob and the checked state of the buttons in the five event handlers:
private void OnActiveJobChanged( JobDefinition activeJob ) => Application.Current.Dispatcher?.BeginInvoke( (Action)( () => { ActiveJob = activeJob.Label; } ) );
private void OnLaserArmed( bool isArmed ) => Application.Current.Dispatcher?.BeginInvoke( (Action)( () => { _armButton.IsChecked = isArmed; } ) );
private void OnJobStarted( JobStartedEventArgs arg ) => Application.Current.Dispatcher?.BeginInvoke( (Action)( () => { _execButton.IsChecked = true; } ) );
private void OnJobFinished( (JobDefinition, BaseScanController) arg ) => Application.Current.Dispatcher?.BeginInvoke( (Action)( () => { _execButton.IsChecked = false; } ) );
private void OnJobAborted( (JobDefinition, BaseScanController) arg ) => Application.Current.Dispatcher?.BeginInvoke( (Action)( () => { _execButton.IsChecked = false; } ) );
The first two of them just have a single parameter, the others have two; as mentioned above, if there is more than one parameter, these must be put into a tuple.
One essential question is not answered until now: How can we access RAYGUIDE's event aggregator to receive and trigger messages? Thanks to the Prism framework this can easily be done in the class's constructor by picking it up as a parameter as you can see in the previous section.
In the same way, it is possible to access RAYGUIDE's MarkerAPI object. This is not needed in this example, but may be necessary in other plug-ins to get data that is not accessible via the event mechanism. Be aware that there is no synchronization with the GUI if the MarkerAPI is used directly: If you arm the laser for example in this way, the corresponding button in the GUI will not be updated.